Bricks Builder is the perfect drag-and-drop website builder for WordPress, allowing you to visually design your entire site in real time on a single screen. The primary focus of Bricks Builder is to provide an effortless website building experience. You don’t require professional developer skills, as the user-friendly interface allows you to create stunning websites without writing a single line of code.
While Bricks Builder shares similarities with Elementor in terms of ease of use, it stands out with some unique features. It produces cleaner code, similar to the oxygen builder. This ensures your website loads faster and performs better, which is crucial for optimizing your core web vitals and enhancing the user experience.
Moreover, Bricks Builder includes a dedicated mobile editing mode, enabling you to optimize your website’s appearance for mobile devices. This ensures that your site looks fantastic and functions seamlessly on smartphones and tablets.
In this article, we will explore the top 12 tips and tricks to make the most out of Bricks Builder. Whether you’re an experienced website builder or just starting, these tips will help you unlock the full potential of this modern website builder while saving your time and effort.
Let’s delve into some unique tricks and tips that can take your Bricks Builder experience to the next level.
Table of Contents
Explore Tips & Tricks
1. Create and Publish a New Page from Bricks Builder
No need to worry about interrupting your workflow when you want to create a new page while working on another one in Bricks Builder. With the first tip, you can effortlessly create a new page right from the Bricks Builder interface.
Here’s how you do it: Look for the “Pages” option in the upper left corner of the Bricks Builder menu bar. Click on it, and then you’ll find a “+” button to create a new page. Once created, you can instantly edit this new page by clicking on it, and it will open in the Bricks Builder interface.
Keep in mind that when you use this method to create a page, it will only be created. To publish the page, you need to click on the “Publish” option within the edit page interface.
2. Switch Pages from Within the Builder
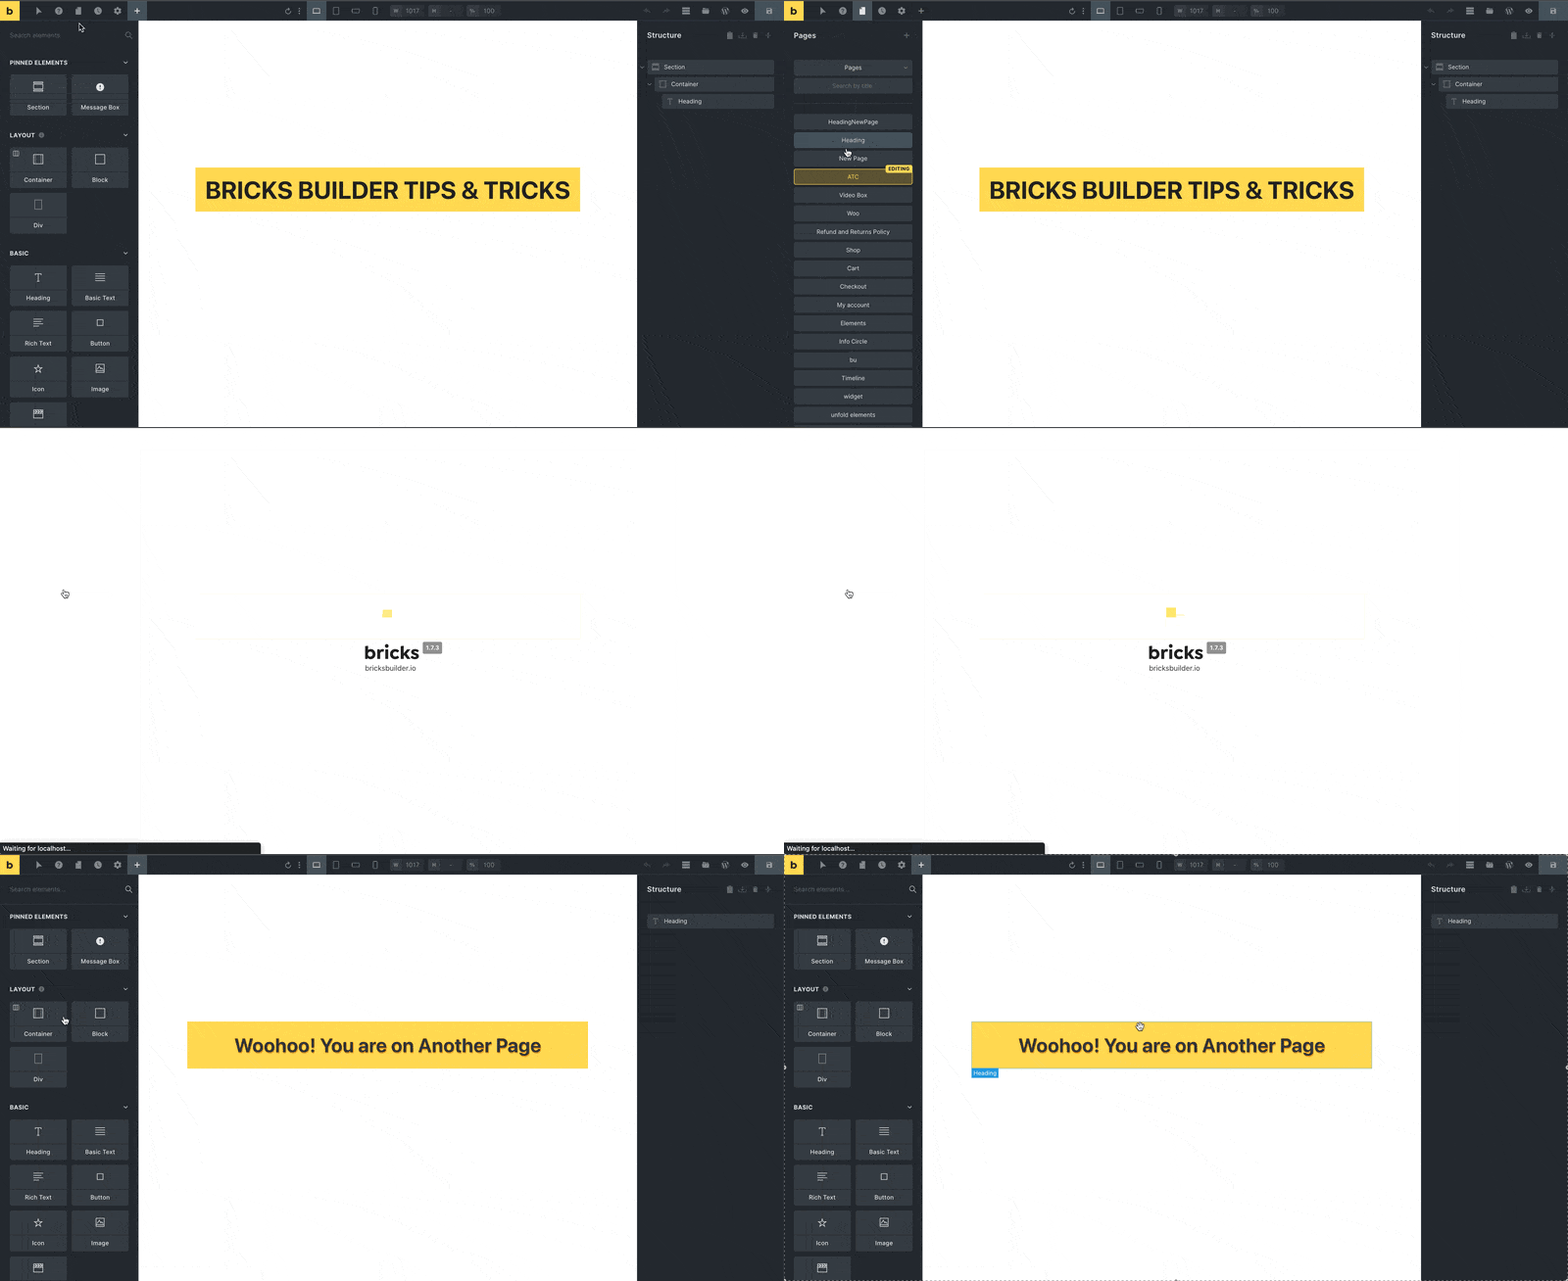
Navigating between pages in the Bricks Builder interface has become a breeze! You can seamlessly access other pages directly from the Bricks while working on your current one, eliminating the need to go back and search for them separately.
Simply click on the “Pages” option, and a list of all the pages created on your website will appear. You can easily view any page by clicking on it, and it will automatically open in the same tab.
If you want to view another page without leaving the current one, right-click on the desired page and choose the “Open in New Tab” option. This way, you can keep both pages accessible simultaneously.
3. Create or Insert a Template within the Bricks Builder
Let’s say you’re designing a blog website with Bricks Builder, and you’re currently working on a single blog post template. However, you also want a separate template for your blog’s homepage, showcasing a list of all your latest posts.
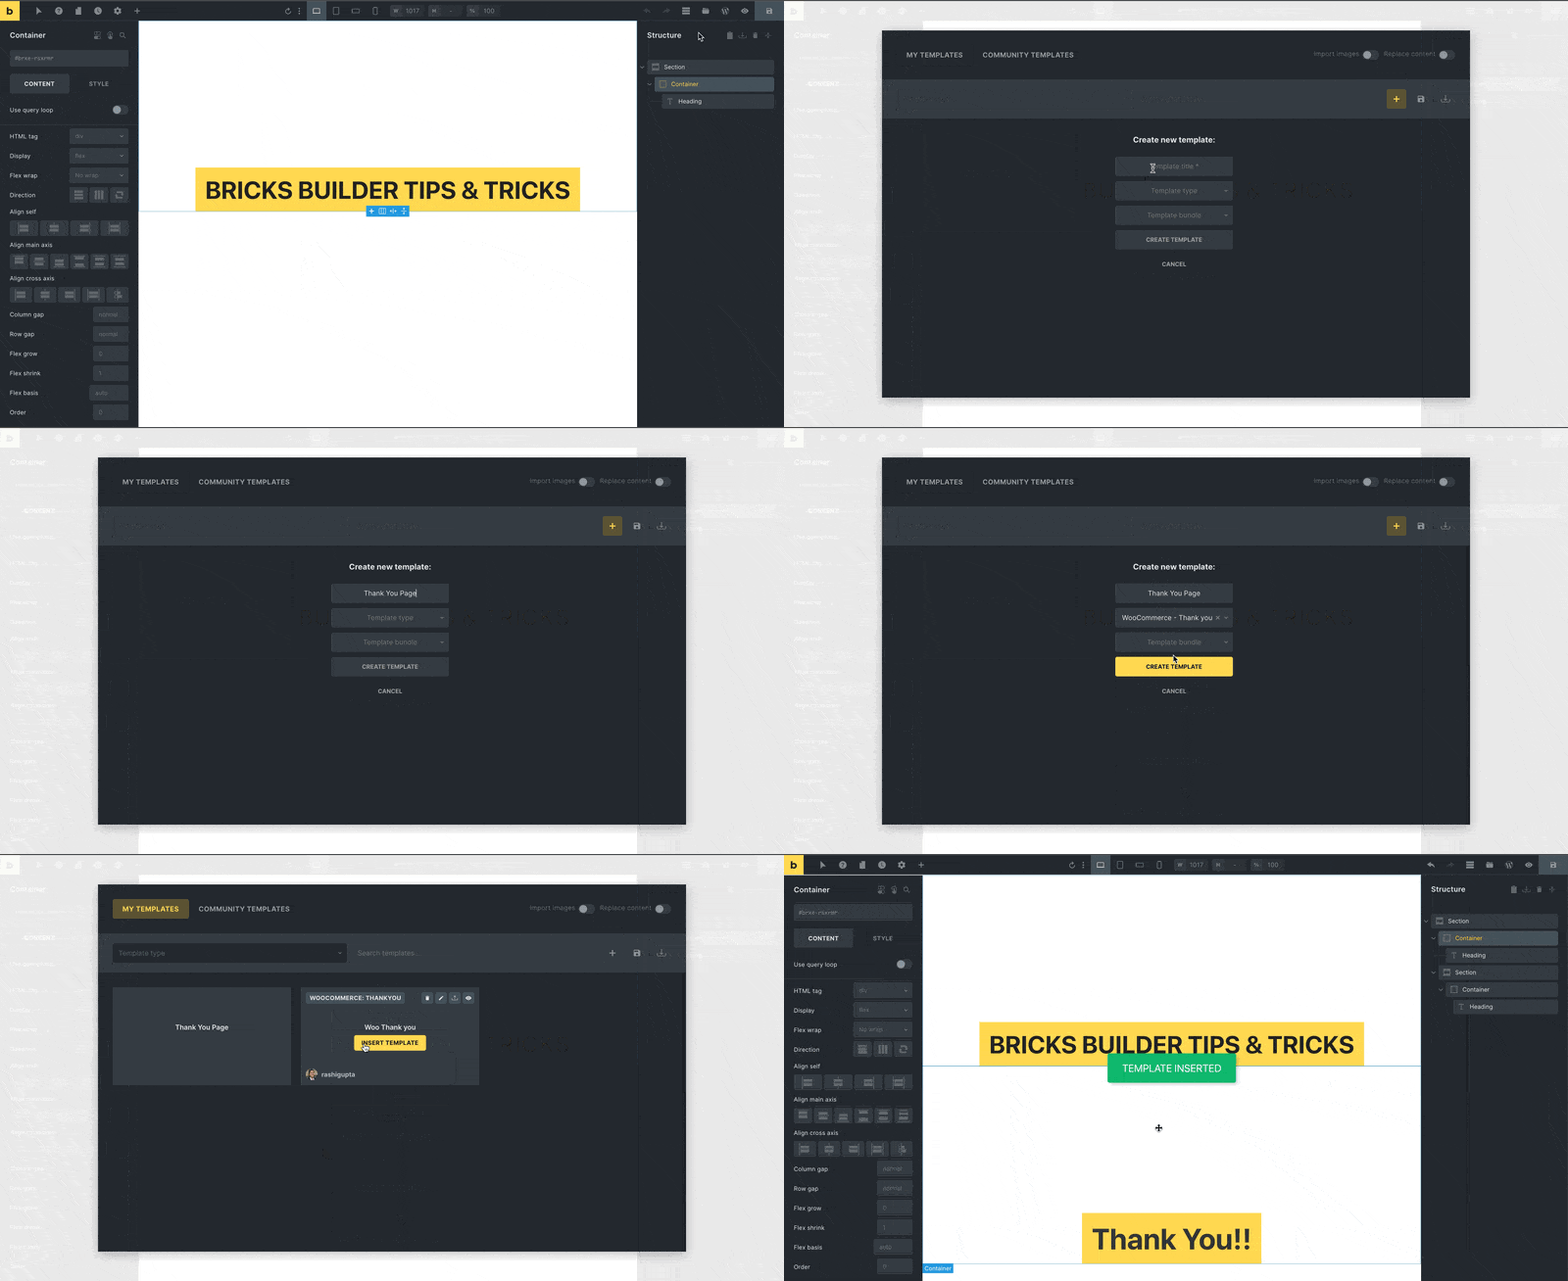
To create a new template from the Bricks Builder interface, you need to click on the “Templates” option and then click on the “+” sign. Now, customize the template according to your preferences and requirements.
If you want to insert a pre-designed template on your page, just click on the “Templates” option again, then a list of all created templates will be displayed. From there, you can effortlessly select the template you want to insert.
4. Create Additional Breakpoints
Breakpoints play an important role in ensuring that your webpage appears correctly and adapts to various devices, making it responsive. With Tip No. 4, you can easily create additional breakpoints to preview your page on multiple devices according to your specific needs.
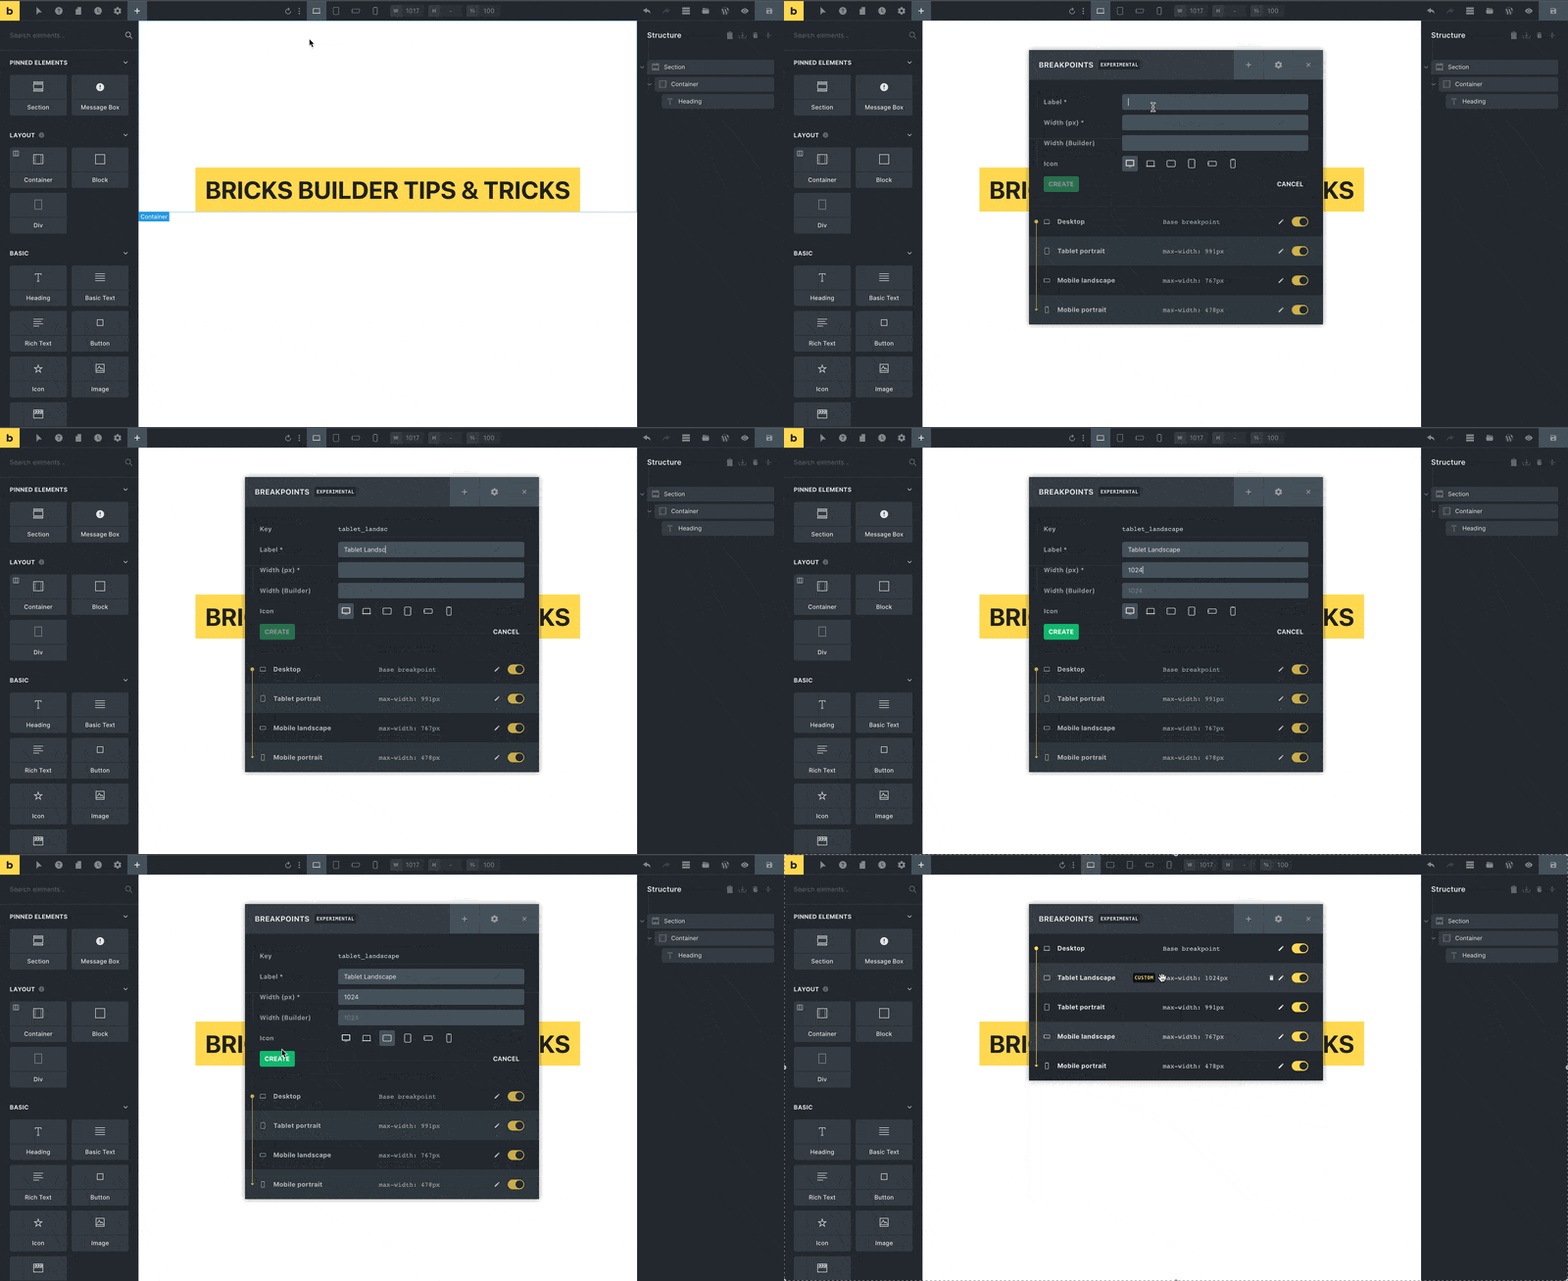
To access this feature, first, make sure you have enabled the Custom Breakpoint option in Bricks ➝ Settings. If it’s already enabled, you can skip this step.
Let’s say you’re designing a website using Bricks Builder and want to ensure that it looks great on smaller screen devices. To achieve this, you can create your breakpoint tailored to your desired screen width size.
Simply click on the three dots in the Bricks Builder breakpoint menubar. Then, click on the “+” sign to add a new breakpoint. Fill in the necessary details, such as the device’s width, a label, an icon, and any other specifications you need. Once you’ve filled in the required information, click the “Create” button to generate the new breakpoint.
5. Preview at a Width in-Between Existing Breakpoints
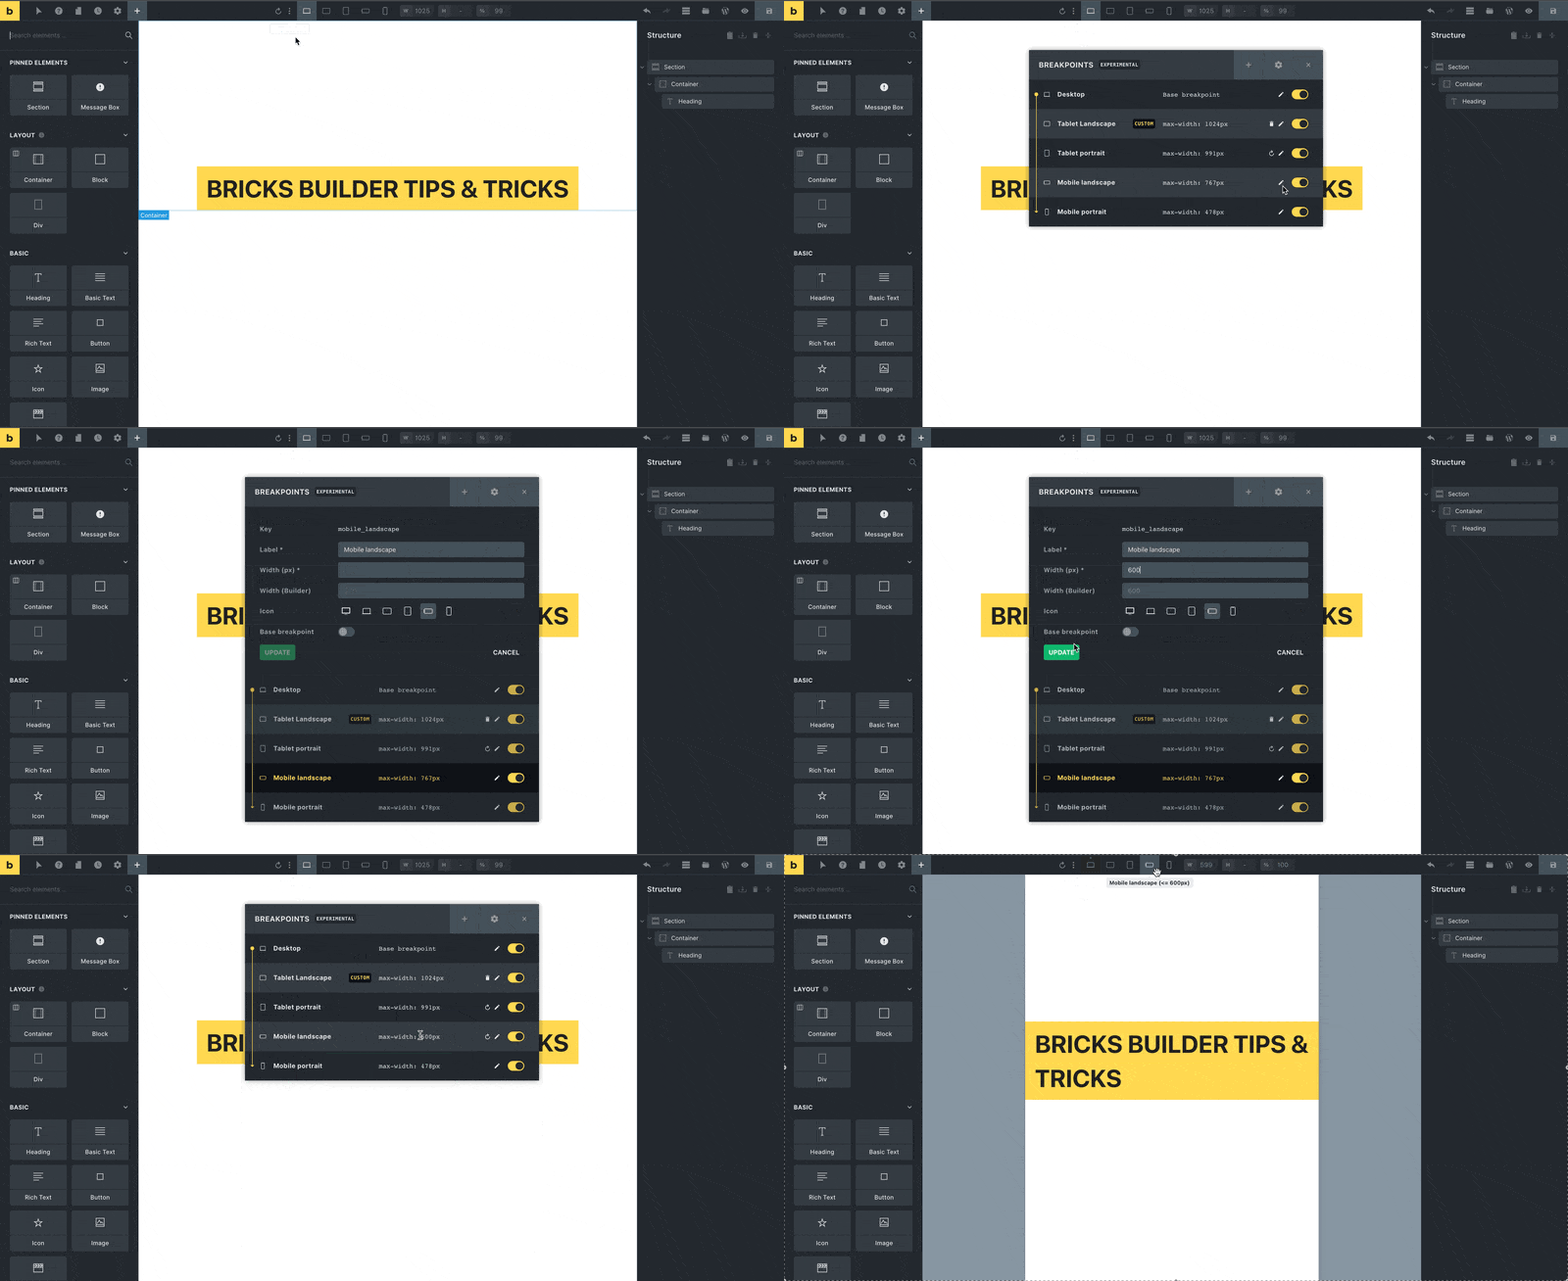
With Bricks Builder, previewing the width of existing breakpoints is a simple process, giving you greater control over your website’s responsiveness. In the Bricks Builder interface, simply click on the three dots option, and a menu will appear, allowing you to access the settings of existing breakpoints.
To adjust a breakpoint’s width, select the “Edit” option of the specific breakpoint you want to modify from the available options. From there, you can easily change the width to your desired value.
Let’s say you have a breakpoint for mobile devices with a width of 480 pixels, but you want to optimize it for smaller smartphones with a width of 360 pixels so you can effortlessly adjust the existing breakpoint’s width to 360 pixels by following the steps mentioned above.
6. Customize Your Style for Each Breakpoint
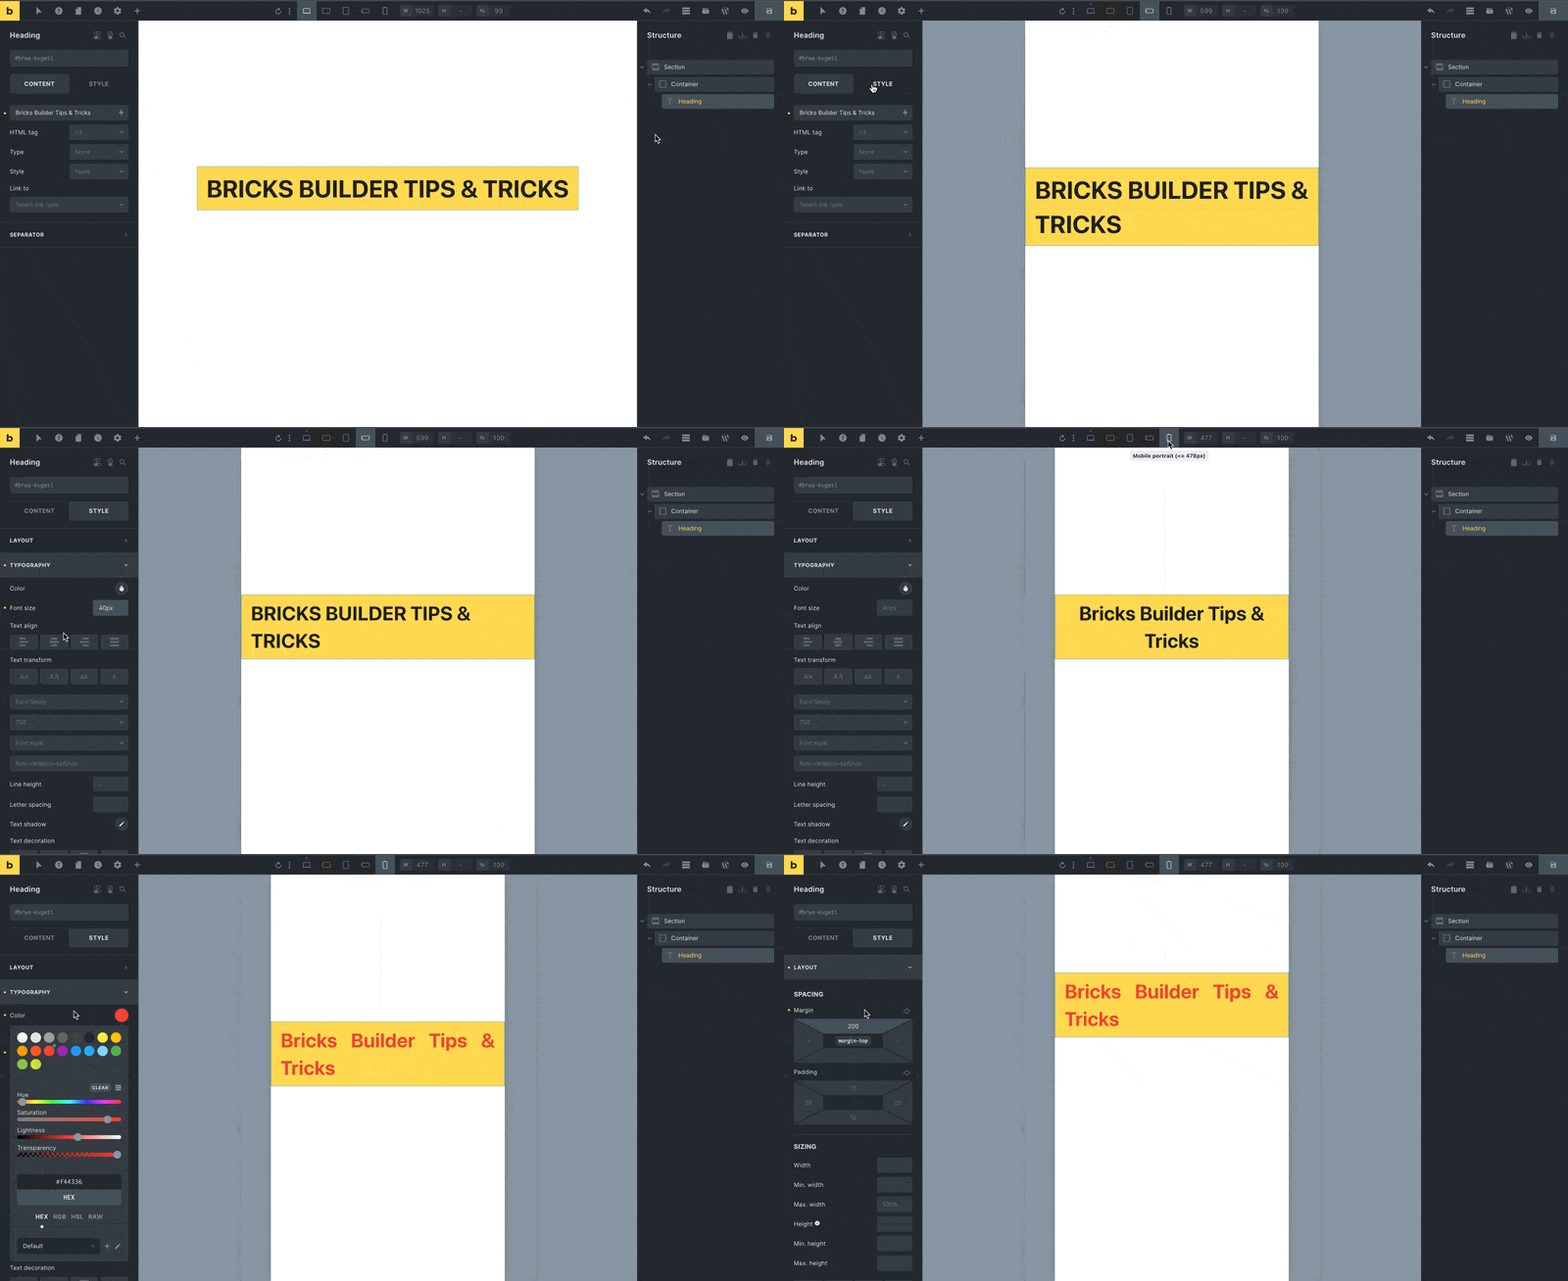
When designing content in Bricks Builder, you may face situations where the layout appears good on larger screens but requires adjustments for optimal display on smaller devices like mobiles. Fortunately, Bricks Builder simplifies this process by allowing you to customize styling for each breakpoint effortlessly.
Let’s say you have a long article designed in Bricks Builder, and it looks great on desktop screens. However, on mobile devices, the text becomes too small, and the images appear too large, disrupting the overall layout. To resolve this, you can select the specific breakpoint corresponding to the mobile screen size and begin styling.
When you set styling for the base breakpoint (e.g., desktop), those styles will be reflected across all breakpoints. But, if you make different styling adjustments for a specific breakpoint (e.g., mobile), those changes will impact that particular breakpoint and all subsequent breakpoints that do not have individual styling.
7. Find Attributes in the Element’s Details Panel Quickly
When dealing with complex designs in Bricks Builder, sometimes the element features are complex and cause confusion. If you are looking for a specific styling feature and don’t want to search through every option manually, there’s a simple and efficient tip.
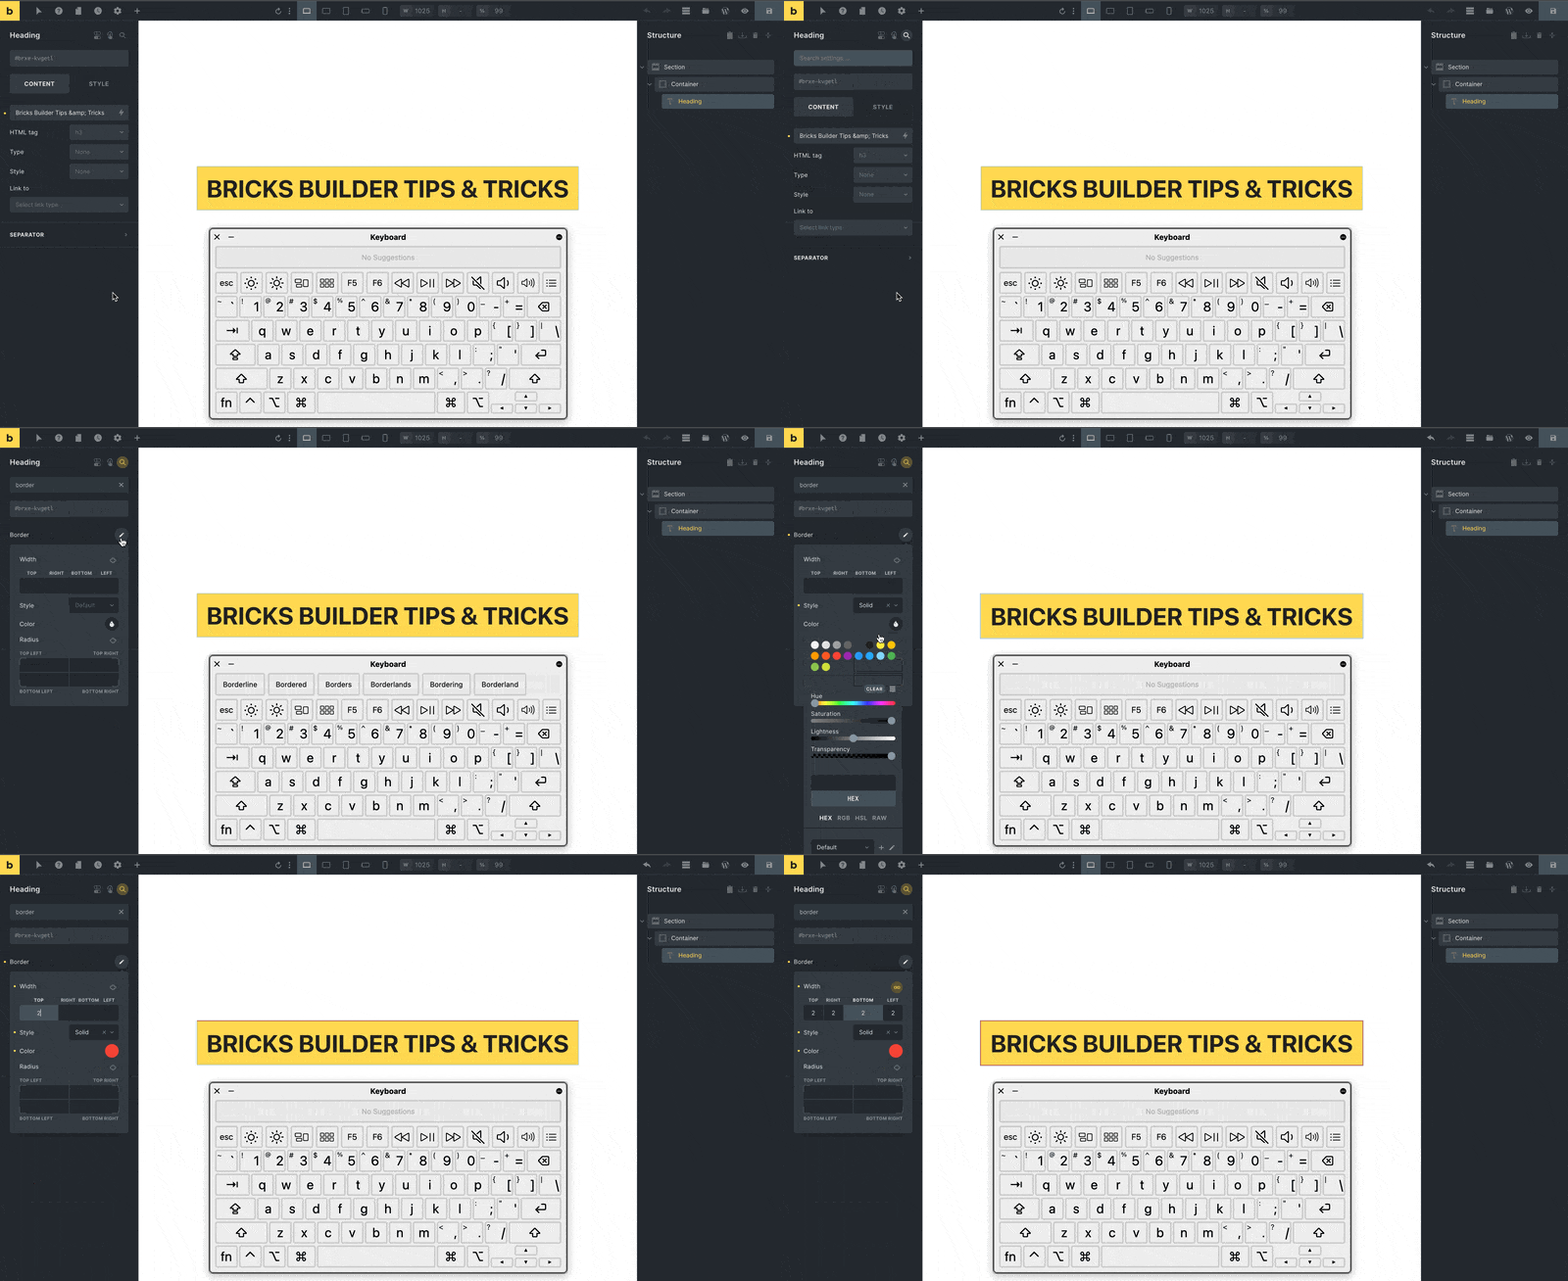
By pressing Shift + Cmd + F (for Mac) or Shift + Ctrl + F (for Windows), you can activate the search bar of elements within Bricks Builder. From there, you can enter the name of the feature you’re seeking, and the search results will instantly display all relevant settings under the element.
For example, let’s say you want to adjust the border color of a specific element on your page. Instead of sifting through various menus and options, you can quickly access the border color settings by using the search function. Just type “border color” in the search bar, and it will display the exact settings for your desired feature.
8. Keyboard Shortcut to Add Elements
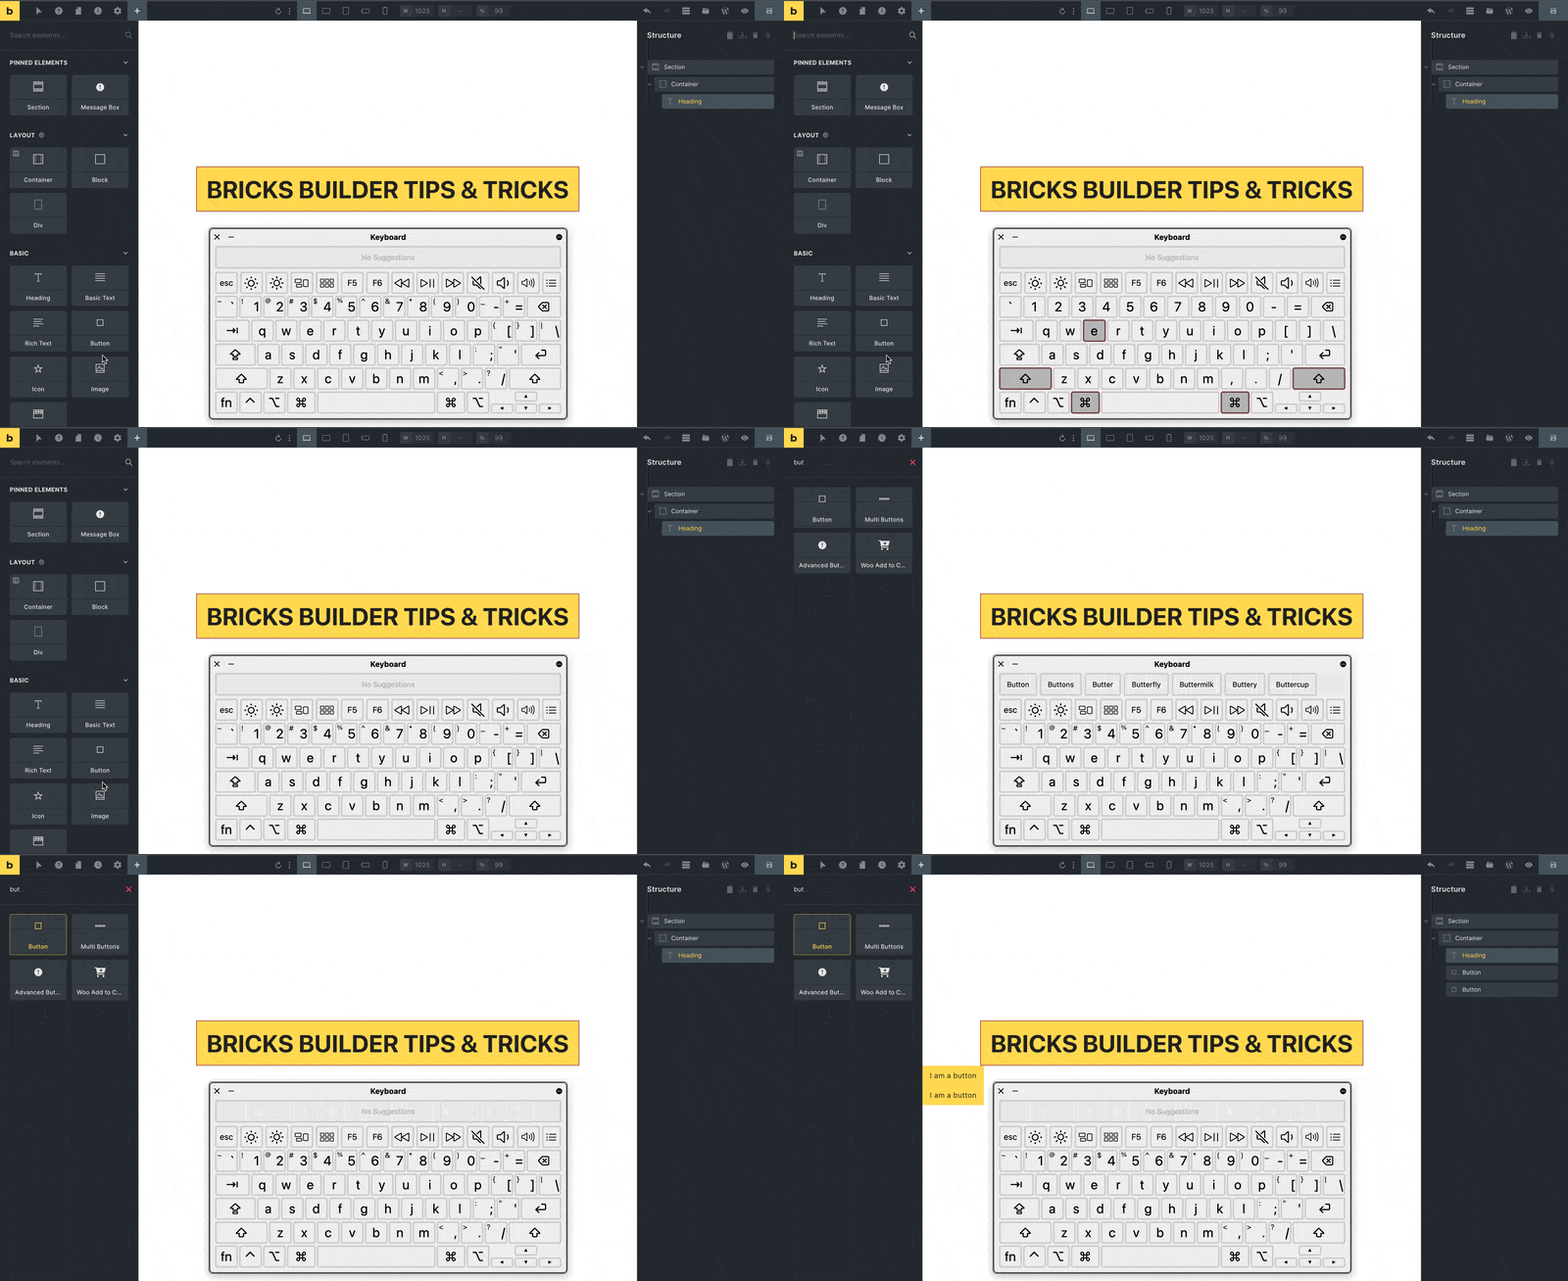
While designing a blog post page in the Bricks Builder interface, you may wish to include a “Call to Action” button to engage your readers so instead of manually scrolling through the lengthy element list to find the button, there’s a quicker and more efficient method available to add any element.
Simply press Shift + Command + E (for Mac) or Shift + Ctrl + E (for Windows), and the quick element search bar will appear. From there, type “Button” to find the desired element quickly. Then, press Tab to select the “Button” element, and with a quick hit of the Enter key, it will instantly be added to your page.
Explore the List Of Keyboard Shortcuts in Bricks Builder to easily perform the most common in-builder actions with simplicity and efficiency.
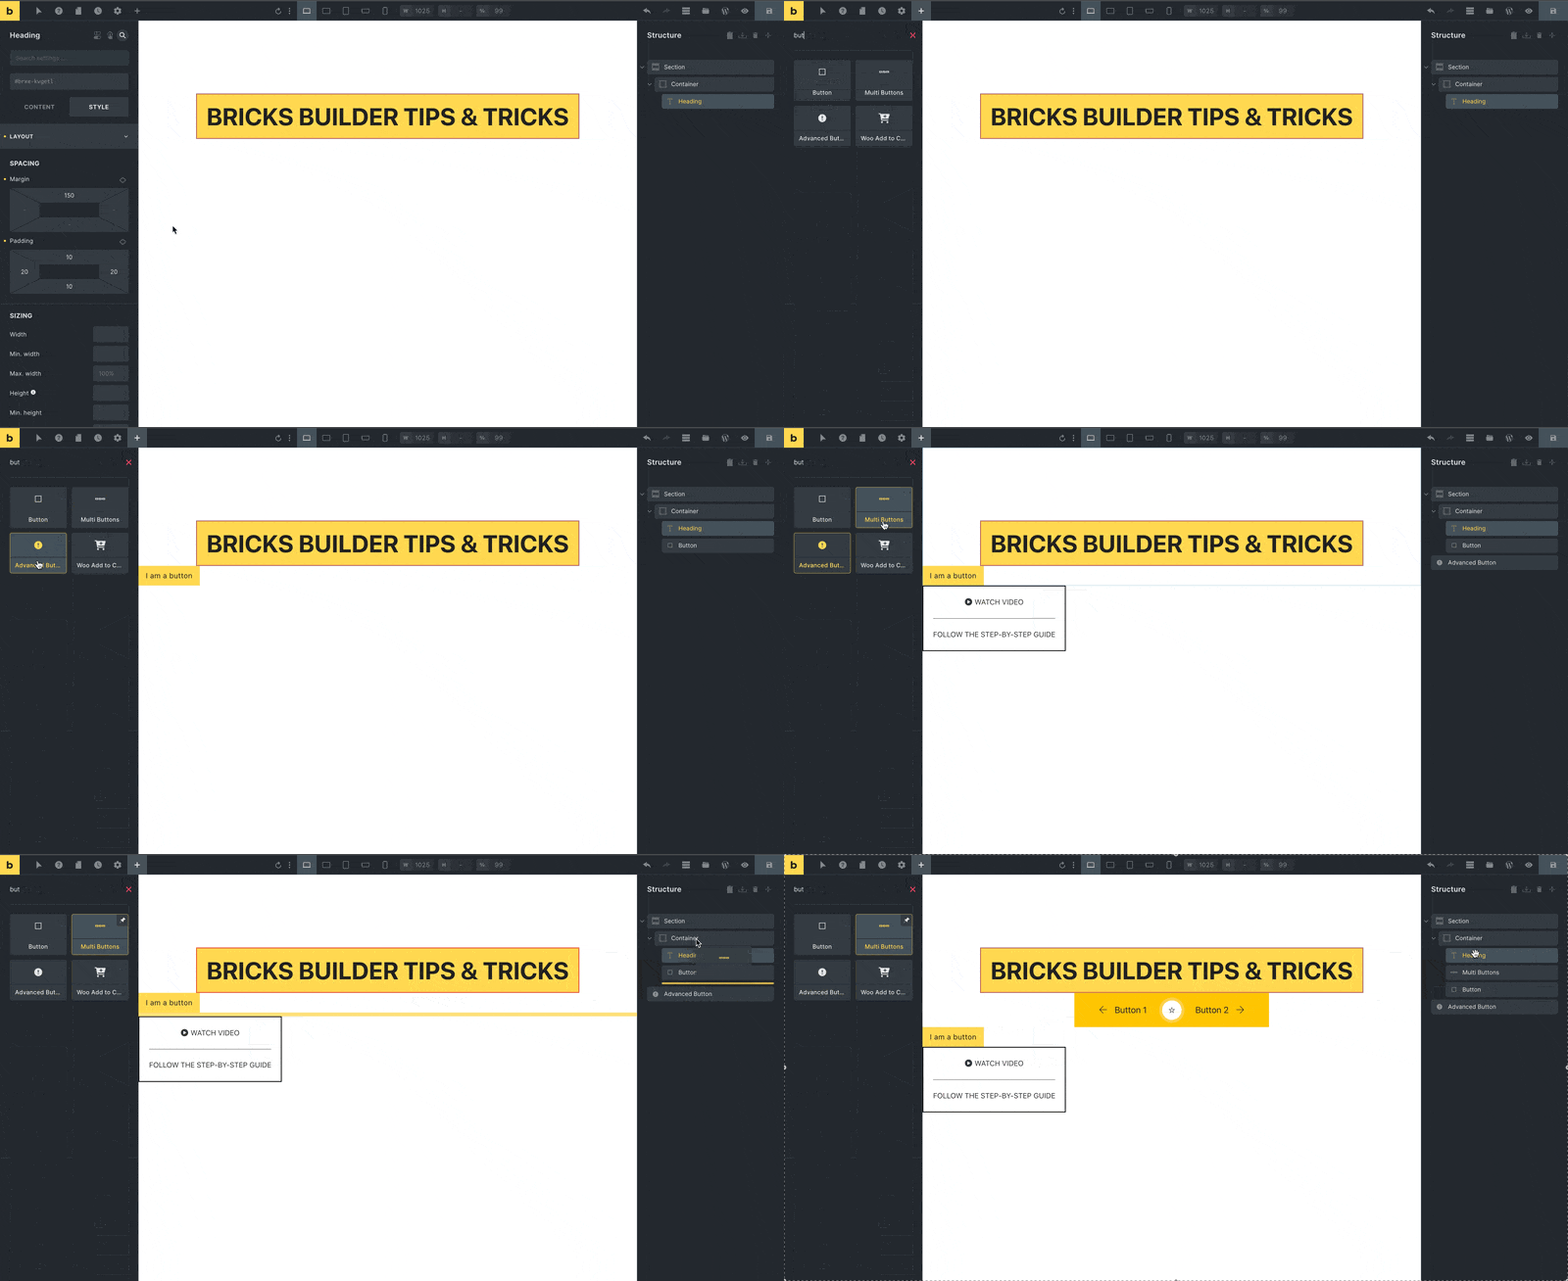
9. Different Ways to Add Elements
Bricks Builder provides users with multiple methods to add elements to their web pages, directly from the builder interface. One of the primary ways is through the shortcut key, which we discussed earlier in this article. Use anchor link
Another useful approach is the drag-and-drop method. In the Element sidebar, you’ll find a wide range of elements available. To add an element, simply click and hold on to the desired element, then drag it onto your page or structure.
Lastly, it also offers a straightforward click-to-add feature. Within the Element sidebar, each element is easily clickable. By clicking on the specific element you want to include, it will instantly appear on your page.
10. Apply Styles with Global Classes
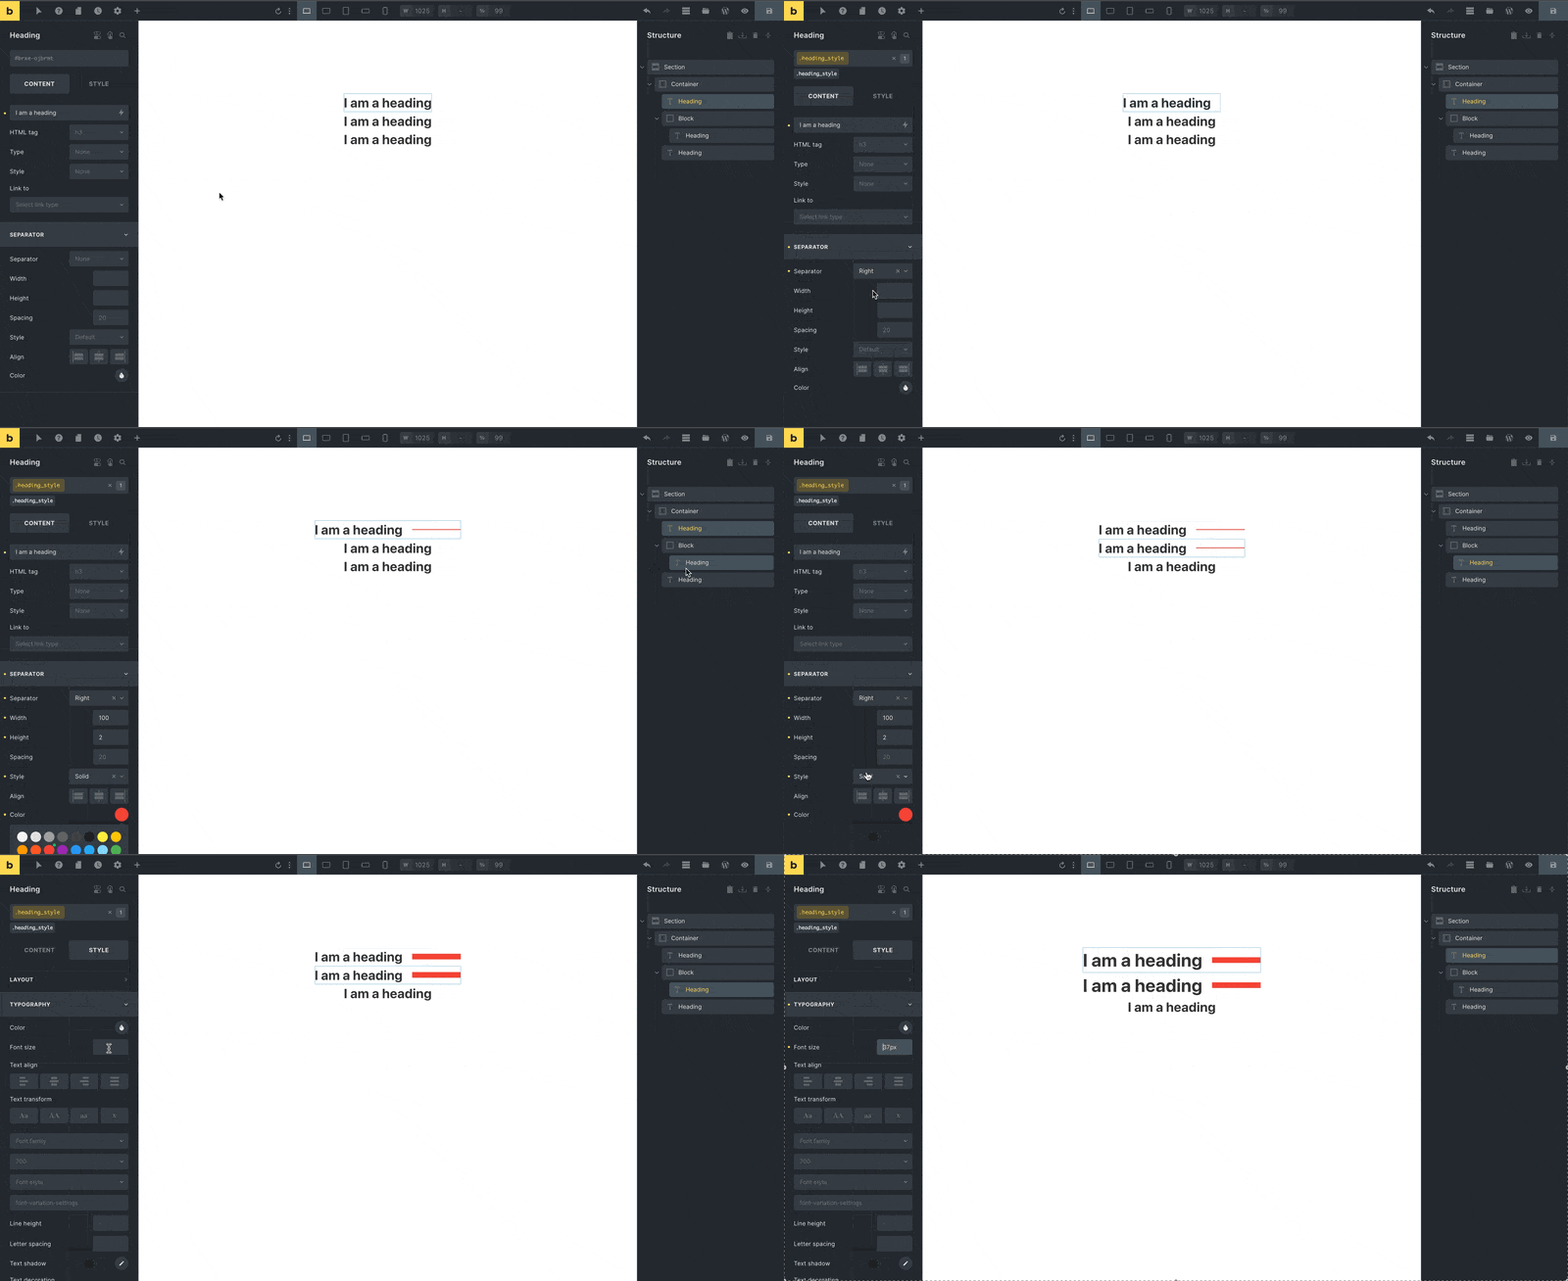
Save time and effort in your website designing process with the Tip 10 of Bricks Builder. To begin, design any element according to your preferences, such as a heading, and apply the desired styling to it. Once the styling is set, you can add a class to that specific element according to the option displayed below.
Next, as you add other elements to your page, you can easily apply the previously created class to those elements. By doing so, the styling of the initial element will be copied and pasted to all subsequent elements where the class is applied.
In the below example, let’s say I start by designing a heading element and applying specific styling to it, like font size, color, and alignment. I add a separator for the heading. Now I create and assign a class to the heading element. Then we add another heading element to our page and simply apply the previously created class. All the styling from the initial heading will be copied over to the new heading element.
However, it’s important to note that the class only copies the styling and not the specific features you may have used, such as the separator in this example. So, you would still need to add Separator in another heading.
11. Access WordPress Editing from Bricks Builder
While working with Advanced Custom Fields in Bricks Builder, editing a page to add data into custom fields requires navigating to the WordPress editor page separately. However, Bricks simplifies this process by providing a convenient option for redirecting to the WordPress editor page directly from the builder.
To access the WordPress editor page, look for the “Edit in WordPress” option located in the upper right menu of the Bricks Builder interface. By clicking on this option, you will be seamlessly redirected to the WordPress editing page within the same tab.
For example, let’s say you are designing a product page using Bricks Builder, and you have custom fields set up in Advanced Custom Fields to input product details, such as price, specifications, and product description. Instead of leaving the Bricks Builder interface, you have to navigate to the WordPress editor separately by selecting edit in the WordPress option as “Open in New tab.”
12. Reusable Elements Across Pages
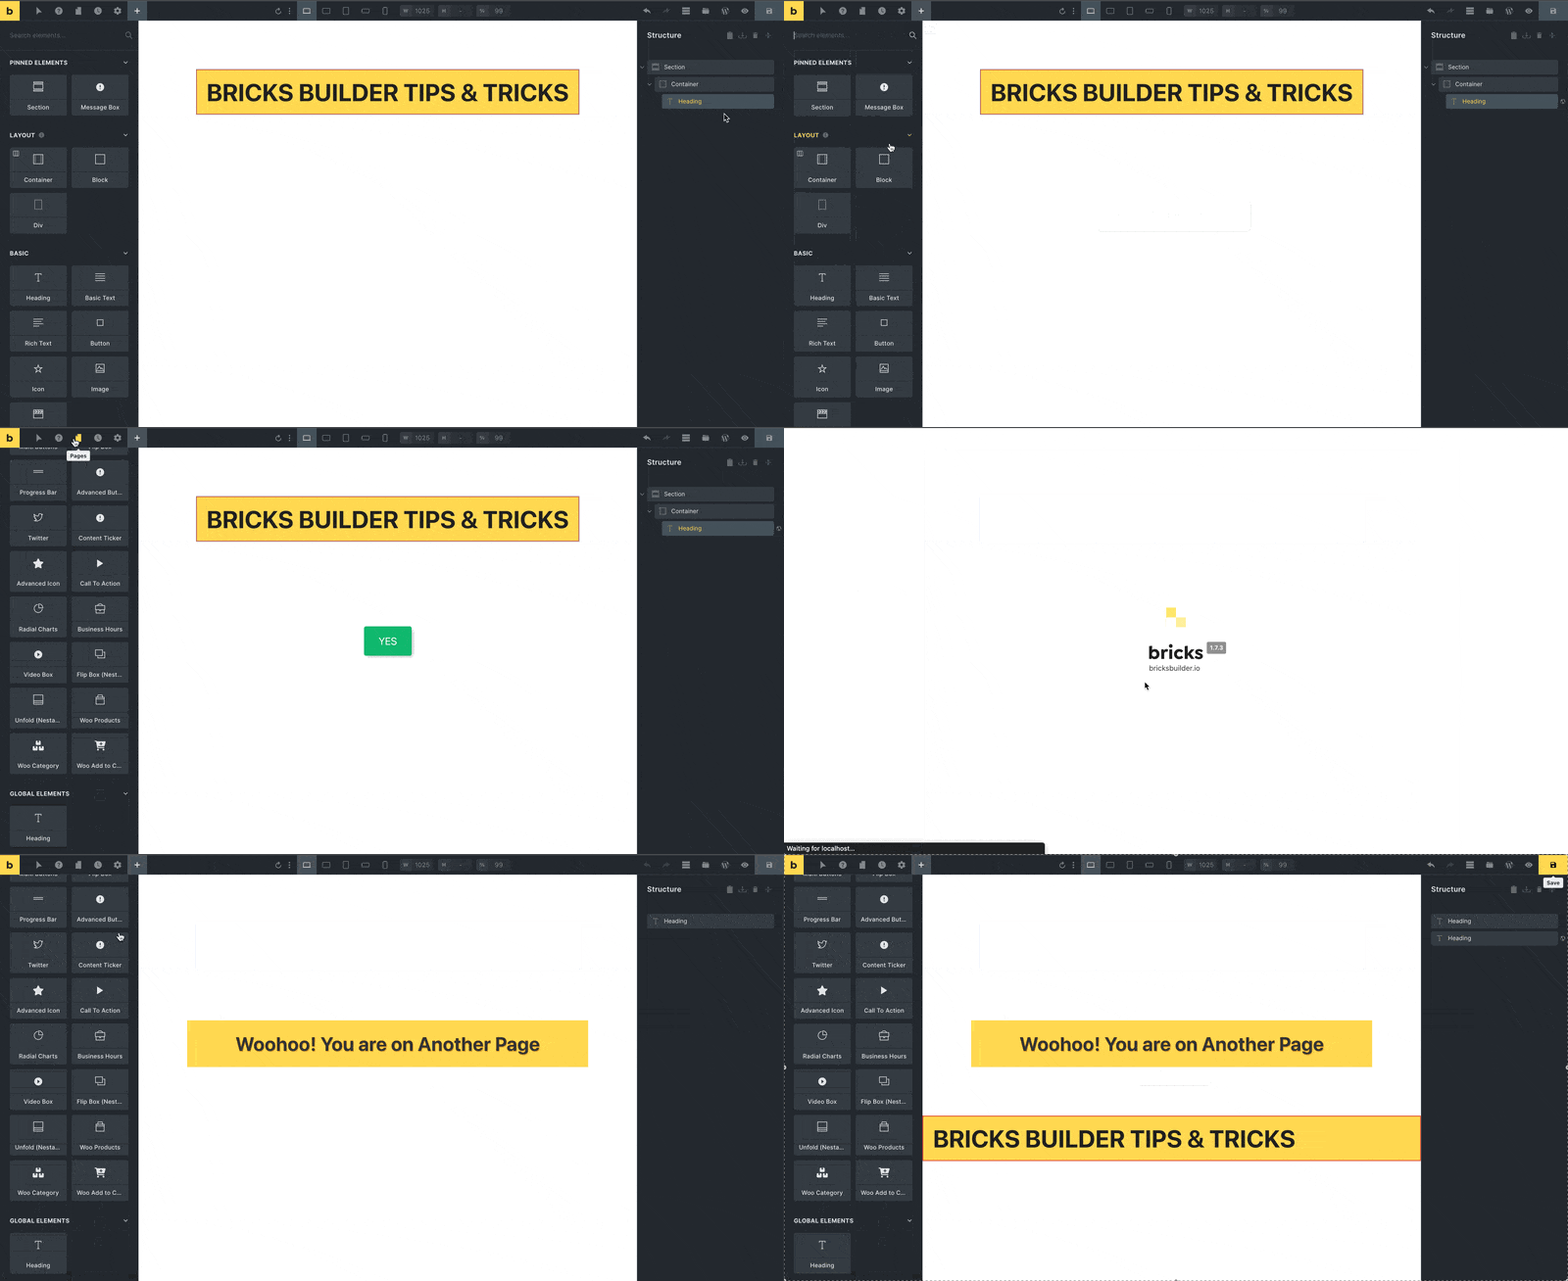
In Bricks Builder, there’s a useful feature that allows you to save any pre-designed element as a Global Element, making it easily accessible across different pages. This is especially handy when you need the same element with the same style in multiple places on your website.
For example, let’s say you’ve designed a beautifully styled “Team Members” section on your homepage. It includes a Designation, an image, and the name of the person providing the details. Now, you want to use this same Team Members section on other pages, like your “About Us” page.
To achieve this, first, create and design the element you want to reuse on various pages. Once you’re satisfied with its appearance, simply select the element by clicking on it. Then, right-click on the element, and a menu will appear. From the menu, choose the “Save as Global Element” option.
Keyboard Shortcuts on Bricks Builder
Easily perform the most common actions by utilizing convenient keyboard shortcuts. These shortcuts provide a quick and efficient way to navigate and execute essential tasks within the builder, saving you time and streamlining your workflow.
Some of the keyboard shortcuts are:
| Keys Combination | Description |
| CMD / CTRL + S | Save changes |
| CMD / CTRL + P | Toggle preview mode |
| CMD / CTRL | Add an element outside the active nestable/parent element |
| CMD / CTRL + B | Switch between different responsive editing modes |
| CMD / CTRL + Z | Undo your last change |
| CMD / CTRL + Shift + Z | Redo your last change |
| CMD / CTRL + Shift + Arrow down | Edit the next element (same level) |
| CMD / CTRL + Shift + Arrow up | Edit the previous element (same level) |
| CMD / CTRL + Shift + Arrow left | Edit parent element(Container) |
| CMD / CTRL + Shift + Arrow right | Edit the first child element |
| CMD / CTRL + Shift + S | Force save all data |
| CMD / CTRL + Shift + D | Duplicate selected element |
| CMD / CTRL + Shift + L | Toggle Template Library |
| CMD / CTRL + Shift + P | Wrap Element in Block |
| CMD / CTRL + Delete | Delete the selected element (and its children) |
| CMD / CTRL + Shift + X | Show Page Structure panel |
| CMD / CTRL + Shift + F | Toggle “Search settings” input (in the panel) |
| CMD / CTRL + Shift + H | Show history/Revision panel |
| CMD / CTRL + Shift + E | Show Elements panel (while focusing on search) |
| CMD / CTRL + ENTER | Toggle selected Element classes UI |
| ESC | Cancel / Close popup (Templates, Classes UI, etc.) |
| Shift (modifier) | Hold down “Shift” to: – Adjust element spacing (margin, padding) or container sizing (height, width) on the canvas in steps of 5 (custom units) or 10 (default unit = px) – Directly edit new element |
Wrap Up
In conclusion, these Bricks Builder tips and tricks provide a seamless and efficient website-building experience. From seamless page creation and breakpoint customization to utilizing global elements and keyboard shortcuts, these techniques will streamline your workflow and enable you to create visually stunning websites effortlessly. With the ability to save and reuse pre-designed elements, achieve consistent styling across pages effortlessly.